2024. 8. 7. 02:33ㆍUnreal Engine
코드 파일 지우는 법
C++ 코드 파일을 지우려면 [Source] 폴더에 가서 헤더파일과 C++ 파일을 지운 후 [Generate Visual Studio project files] 눌러서 다시 솔루션 파일 만든다음 빌드하면 된다.


Migrate
[Content Browser]에서 필요한 요소만 뽑아서 저장하고 싶으면 [Asset Actions] - [Migrate...] 눌러서 저장하면 된다. 마치 Unity Package를 만드는 것처럼 의존되어 있는 요소도 함께 저장된다.

적 죽을 때 폭발 이펙트 C++로 만들기

CEnemy.h 헤더파일에 코드 추가
//폭발효과 공장
UPROPERTY(EditAnywhere, Category = "MySettings") //에디터에 노출
class UParticleSystem* bombFactory;
전체 코드
// Fill out your copyright notice in the Description page of Project Settings.

#pragma once

#include "CoreMinimal.h"
#include "GameFramework/Actor.h"
#include "CEnemy.generated.h"

UCLASS()
class SHOOTING_API ACEnemy : public AActor
{
	GENERATED_BODY()

public:
	// Sets default values for this actor's properties
	ACEnemy();

protected:
	// Called when the game starts or when spawned
	virtual void BeginPlay() override;

public:
	// Called every frame
	virtual void Tick(float DeltaTime) override;

public:
	UPROPERTY(VisibleAnywhere)
	class UBoxComponent* BoxComp;
	UPROPERTY(VisibleAnywhere)
	class UStaticMeshComponent* BodyMesh;

public:
	UPROPERTY(EditAnywhere, BlueprintReadWrite, Category = "MySettings")
	float speed = 500;
	UPROPERTY()
	AActor* target;
	FVector dir;

	UFUNCTION()
	void OnComponentBeginOverlap(UPrimitiveComponent* OverlappedComponent, AActor* OtherActor, UPrimitiveComponent* OtherComp, int32 OtherBodyIndex, bool bFromSweep, const FHitResult& SweepResult);

	//폭발효과 공장
	UPROPERTY(EditAnywhere, Category = "MySettings") //에디터에 노출
	class UParticleSystem* bombFactory;
};
빌드 후 BP_CEnemy를 열어서 [Details]에 mysettings를 검색하면 [Bomb Factory]를 볼 수 있다.

P_Explosion을 불러오도록 설정한다.

CEnemy.cpp 파일에서 코드 추가
//폭발 효과 재생
UGameplayStatics::SpawnEmitterAtLocation(GetWorld(), bombFactory, GetActorLocation(), FRotator(), true);
전체 코드
// Fill out your copyright notice in the Description page of Project Settings.


#include "CEnemy.h"
#include "Components/BoxComponent.h"
#include <Kismet/GameplayStatics.h>
#include "CPlayer.h"
#include <Kismet/KismetMathLibrary.h>

// Sets default values
ACEnemy::ACEnemy()
{
 	// Set this actor to call Tick() every frame.  You can turn this off to improve performance if you don't need it.
	PrimaryActorTick.bCanEverTick = true;

	BoxComp = CreateDefaultSubobject<UBoxComponent>(TEXT("BoxComp"));

	//BoxComp를 Root로 등록
	RootComponent = BoxComp;

	//Collision Profile 설정하기
	BoxComp->SetCollisionProfileName(TEXT("EnemyProfile"));

	//충돌 overlap 처리 이벤트 등록
	BoxComp->OnComponentBeginOverlap.AddDynamic(this, &ACEnemy::OnComponentBeginOverlap);

	//BodyMesh 그릇에 StaticMeshComponent를 만들어서 담으려고 한다.
	BodyMesh = CreateDefaultSubobject<UStaticMeshComponent>(TEXT("BodyMesh"));
	BodyMesh->SetupAttachment(BoxComp);

	BodyMesh->SetCollisionEnabled(ECollisionEnabled::NoCollision);

	//사용할 Static Mesh 데이터를 읽어서 컴포넌트에 할당하기
	ConstructorHelpers::FObjectFinder<UStaticMesh> TempMesh(TEXT("/Script/Engine.StaticMesh'/Game/Drone/Drone_low.Drone_low'"));
	//로딩 성공하면 BodyMesh에 사용할 Static Mesh로 TempMesh를 넣는다.
	if (TempMesh.Succeeded())
	{
		BodyMesh->SetStaticMesh(TempMesh.Object);
		BodyMesh->SetRelativeLocation(FVector(50.0f, 0, 0));
		BodyMesh->SetRelativeRotation(FRotator(0, -90.0f, -90.0f));
	}
}

// Called when the game starts or when spawned
void ACEnemy::BeginPlay()
{
	Super::BeginPlay();

	//타겟 찾기
	target = UGameplayStatics::GetActorOfClass(GetWorld(), ACPlayer::StaticClass());

	//아래로 방향 설정
	dir = FVector(0, 0, -1);

	//타겟이 있고 30%의 확률로 타겟쪽으로
	int percent = FMath::RandRange(1, 10);
	if (IsValid(target) && percent <= 3)
	{
		dir = target->GetActorLocation() - GetActorLocation();
		dir.Normalize();
	}

	//타겟 방향으로 회전하기
	FRotator rot = UKismetMathLibrary::MakeRotFromXZ(GetActorForwardVector(), dir);
	SetActorRotation(rot);
}

// Called every frame
void ACEnemy::Tick(float DeltaTime)
{
	Super::Tick(DeltaTime);

	//이동
	FVector P0 = GetActorLocation(); //현재 위치 설정
	FVector vt = dir * speed * DeltaTime;
	FVector P = P0 + vt;
	SetActorLocation(P);
}

void ACEnemy::OnComponentBeginOverlap(UPrimitiveComponent* OverlappedComponent, AActor* OtherActor, UPrimitiveComponent* OtherComp, int32 OtherBodyIndex, bool bFromSweep, const FHitResult& SweepResult)
{
	//폭발 효과 재생
	UGameplayStatics::SpawnEmitterAtLocation(GetWorld(), bombFactory, GetActorLocation(), FRotator(), true);
	//상대편 파괴
	OtherActor->Destroy();
	//나 자신 파괴
	Destroy();
}
빌드 후 실행하면 잘 된다.

적을 계속 생성할 EnemyGOD를 C++로 만들기
EnemyGOD C++ Class 생성


CEnemyGOD.h 코드 추가
//일정시간에 한 번씩 적 생성
UPROPERTY(EditAnywhere, Category = "MySettings")
float createTime = 2.0f; //생성 시간
float currentTime = 0; //경과 시간
//적 공장
UPROPERTY(EditAnywhere, Category = "MySettings")
TSubclassOf<class ACEnemy> enemyFactory;
전체 코드
// Fill out your copyright notice in the Description page of Project Settings.

#pragma once

#include "CoreMinimal.h"
#include "GameFramework/Actor.h"
#include "CEnemyGOD.generated.h"

UCLASS()
class SHOOTING_API ACEnemyGOD : public AActor
{
	GENERATED_BODY()

public:
	// Sets default values for this actor's properties
	ACEnemyGOD();

protected:
	// Called when the game starts or when spawned
	virtual void BeginPlay() override;

public:
	// Called every frame
	virtual void Tick(float DeltaTime) override;

	//일정시간에 한 번씩 적 생성
	UPROPERTY(EditAnywhere, Category = "MySettings")
	float createTime = 2.0f; //생성 시간
	float currentTime = 0; //경과 시간
	//적 공장
	UPROPERTY(EditAnywhere, Category = "MySettings")
	TSubclassOf<class ACEnemy> enemyFactory;
};
빌드 후 C++을 블루프린트로 만들기. BP_CEnemyGOD 이름으로 생성했다.

[Details]에서 enemy를 검색하여 BP_CEnemy를 넣는다.

CEnemyGOD.cpp에 코드 추가
#include <CEnemy.h>void ACEnemyGOD::Tick(float DeltaTime)
{
Super::Tick(DeltaTime);
//일정시간에 한 번씩 적 생성
currentTime += DeltaTime;
if (currentTime > createTime)
{
GetWorld()->SpawnActor<ACEnemy>(enemyFactory, GetActorLocation(), FRotator());
currentTime = 0; //시간 초기화
}
}
전체 코드
// Fill out your copyright notice in the Description page of Project Settings.
#include "CEnemyGOD.h"
#include <CEnemy.h>
// Sets default values
ACEnemyGOD::ACEnemyGOD()
{
// Set this actor to call Tick() every frame. You can turn this off to improve performance if you don't need it.
PrimaryActorTick.bCanEverTick = true;
}
// Called when the game starts or when spawned
void ACEnemyGOD::BeginPlay()
{
Super::BeginPlay();
}
// Called every frame
void ACEnemyGOD::Tick(float DeltaTime)
{
	Super::Tick(DeltaTime);

	//일정시간에 한 번씩 적 생성
	currentTime += DeltaTime;
	if (currentTime > createTime)
	{
		GetWorld()->SpawnActor<ACEnemy>(enemyFactory, GetActorLocation(), FRotator());
		currentTime = 0; //시간 초기화
	}
}
빌드 후 Viewport에서 BP_CEnemyGOD를 드래그 앤 드랍. 위치 맞추면 잘 나온다.

배경 넣기
Plane 끌어다 놓고 Transform 설정.

이전에 만들어놨던 메테리얼을 놓고 Transform을 다시 세팅하면 잘 실행되는 것을 볼 수 있다.


프로젝트 빌드
[Platforms] - [Windows] - [Package Project]를 통해서 윈도우 빌드를 할 수 있다.

오류 없이 잘 실행되었다.
슈팅 프로젝트 끝.
TPS 프로젝트 생성
Blank, BluePrint 선택, 이름은 "KNUT_TPS"로 생성했다.

Ctrl + N으로 [Basic] 레벨을 생성한다. 이후 TPSMap 이름으로 레벨 저장.

캐릭터 콘텐츠 팩 가져오기
[Add] - [Add Feature or Content Pack..] 선택

[Third Person]을 선택해서 추가한다.

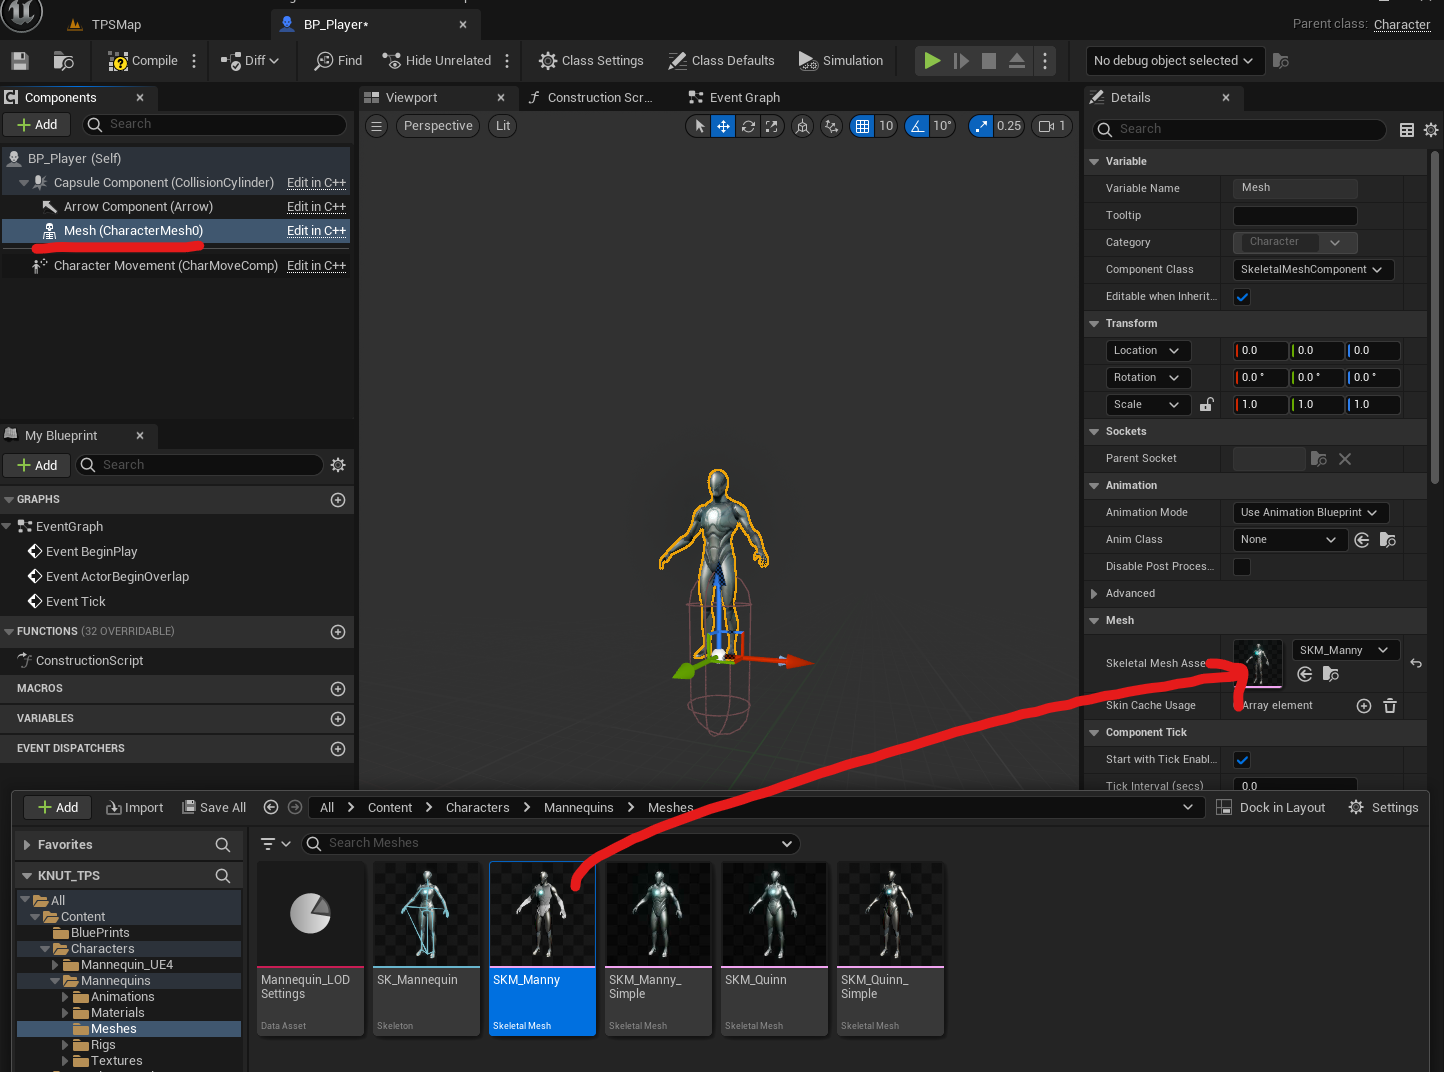
BluePrints 폴더를 생성하고 [Character] 블루프린트를 생성한다. 이름은 BP_Player

BP_Player에서 Hierarchy의 Mesh를 선택하고 SKM_Manny 마네킹을 오른쪽 [Details] - [Mesh]에 끌어 놓으면 형태를 볼 수 있다.
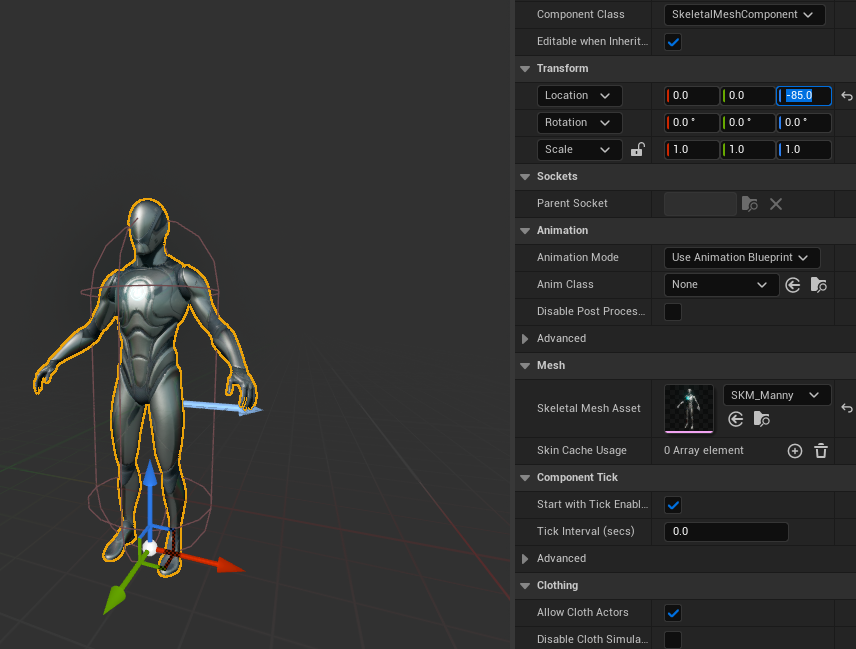
Transform을 잡아준다.
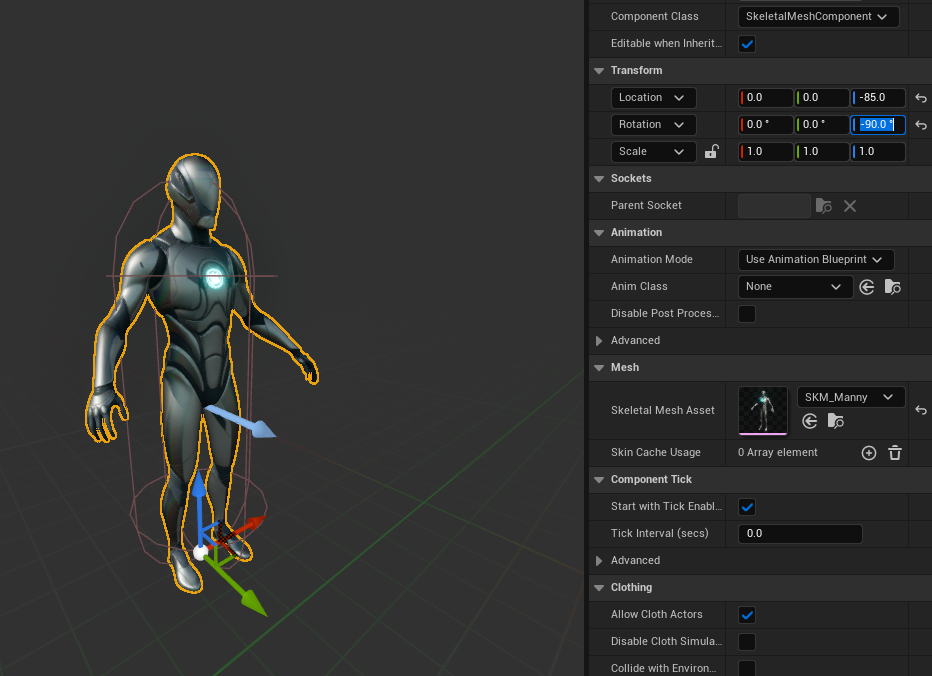
화살표 방향이 앞방향이기 때문에 Rotation도 수정한다.
[Animation] 부분을 보게 되면 [Animation Mode] - [Use Animation Asset]을 선택한 후 아래 [Anim to Play]에서 idle을 검색하여 MF_Idle을 적용해보았다.


캐릭터 이동하기
Project Settings의 [Engine] - [Input]을 보면 이미 많은 키가 세팅되어 있는 것을 볼 수 있다.

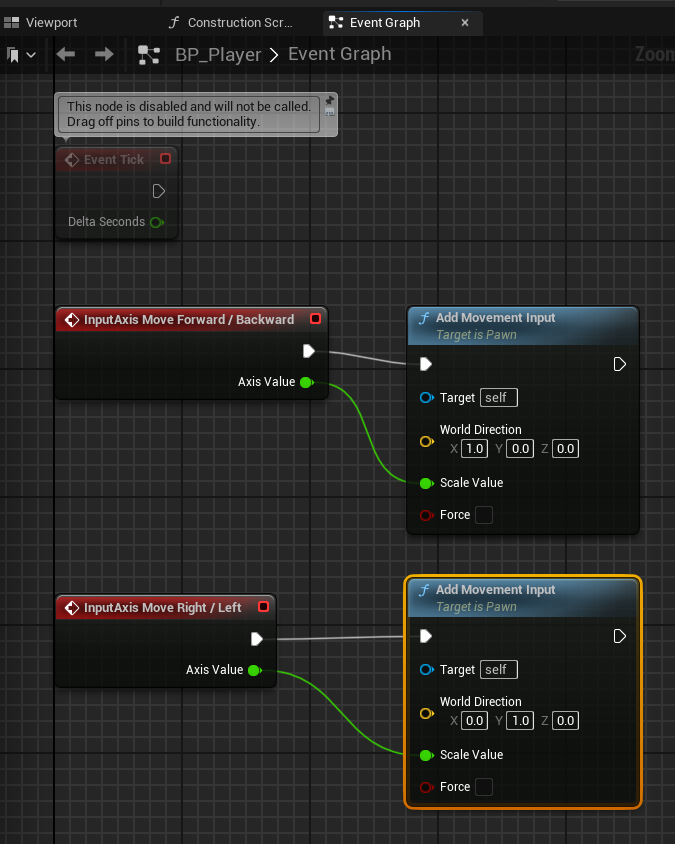
BP_Player의 Event Graph에서 아래의 노드 세팅을 한다. 앞뒤로 움직일 수 있도록 [Add Movement Input] - [World Direction]은 (1, 0, 0)으로 수정했다.

Viewport에 BP_Player 끌어다 놓고 possess 검색하여 [Auto Possess Player] - [Player 0]을 세팅한다.

좌우 움직임도 마찬가지로 노드를 세팅한다.
앞뒤좌우로 움직인다.
