2023. 12. 1. 18:02ㆍSKKU DT
튜플
여러 필드를 담을 수 있는 구조체. 구조체이므로 값 형식이다.
값을 보고 판단한다.
using System.Collections;
using System.Collections.Generic;
using UnityEngine;

public class Tuple : MonoBehaviour
{
    void Start()
    {
        var a = ("슈퍼맨", 9999);
        Debug.Log($"{a.Item1}, {a.Item2}");

        var b = (Name: "박상현", Age: 17);
        Debug.Log($"{b.Name}, {b.Age}");

        var (name, age) = b;
        Debug.Log($"{name} {age}");

        var (name2, age2) = ("박문수", 34);
        Debug.Log($"{name2}, {age2}");

        b = a;
        Debug.Log($"{b.Name}, {b.Age}");
    }
}
인터페이스
인터페이스는 약속이다. 어떤 걸 눌렀을 때 어떤 기능이 나오는지는 약속이 되어있다.
인터페이스 안에 멤버 변수를 선언할 수는 없다. 하지만 프로퍼티를 사용한 "int age {get; set;}" 형태는 가능
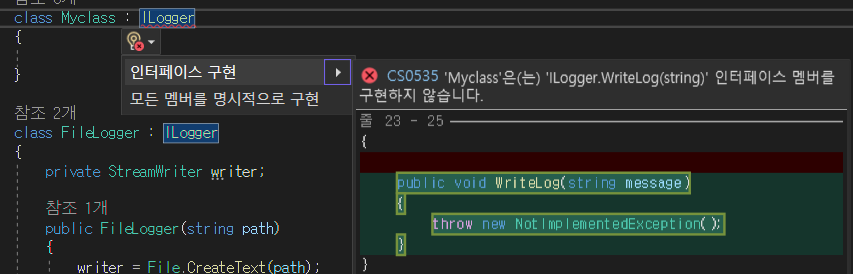
만약 인터페이스가 가지고 있는 멤버를 구현하지 않았다면 오류 메시지가 나온다.

오류 부분에 마우스를 가져다 대면 어떻게 사용해야 하는지 알려준다.
인터페이스 예시
using System;
using System.Collections;
using System.Collections.Generic;
using System.IO;
using UnityEngine;

namespace Interface
{
    interface ILogger //인터페이스는 'I'로 시작한다.
    {
        void WriteLog(string message); //메서드(함수)
    }

    class ConsoleLogger : ILogger //상속이 아니라 인터페이스를 가져온 약속이다.
    {
        public void WriteLog(string message) //메서드 구현
        {
            Debug.Log($"{DateTime.Now.ToLocalTime()}, {message}");
        }
    }

    class FileLogger : ILogger
    {
        private StreamWriter writer;

        public FileLogger(string path)
        {
            writer = File.CreateText(path);
            writer.AutoFlush = true;
        }

        public void WriteLog(string message)
        {
            writer.WriteLine($"{DateTime.Now.ToShortTimeString()}, {message}");
        }
    }

    class ClimateMonitor
    {
        private ILogger logger;
        public ClimateMonitor(ILogger logger)
        {
            this.logger = logger;
        }

        public void start()
        {
            while (true)
            {
                string temperature = "30";
                if (temperature == "")
                    break;

                logger.WriteLog("현재 온도: " + temperature);
            }
        }
    }
    public class Interface : MonoBehaviour
    {
        void Start()
        {
            ClimateMonitor monitor = new ClimateMonitor(new FileLogger("MyLog.txt"));
            monitor.start();
        }
    }
}
예시2 -인터페이스 사용하지 않았을 때
using System.Collections;
using System.Collections.Generic;
using UnityEngine;

namespace InterfaceMini
{
    class Person
    {
        public void Move()
        {
            Debug.Log("Move!");
        }
    }

    class StageManager
    {
        private List<Person> people = new List<Person>(); //만들어진 객체를 리스트에 저장할 목적으로 리스트 생성

        public StageManager(int person) //스테이지에 몇 명을 등장시킬 것인지 매개변수로 받는다.
        {
            for (int i = 0; i < person; i++) //매개변수 숫자 만큼의 객체가 생성
            {
                people.Add(new Person()); //만들어진 객체는 리스트에 저장
            }
        }

        //특정 스테이지를 시작하는 메서드
        public void StartStage()
        {
            //Person 객체에게 움직일 수 있도록 Move() 함수를 부여한다.
            foreach (Person person in people) //리스트에서 하나씩 꺼낸다.
            {
                person.Move(); //행동 부여
            }
        }
    }
    public class InterfaceMini : MonoBehaviour
    {
        void Start()
        {
            StageManager stageManager = new StageManager(3); //위에서 만든 StageManager를 사용
        }
    }
}
예시2 -인터페이스 사용했을 때
using System.Collections;
using System.Collections.Generic;
using UnityEngine;

namespace InterfaceMini
{
    interface IPerson
    {
        void Move();
    }

    class StageManager
    {
        private List<IPerson> people = new List<IPerson>(); //만들어진 객체를 리스트에 저장할 목적으로 리스트 생성

        public StageManager(List<IPerson> people) //스테이지 에 몇 명을 등장시킬 것인지 매개변수로 받는다.
        {
            this.people = people;
        }

        //특정 스테이지를 시작하는 메서드
        public void StartStage()
        {
            //Person 객체에게 움직일 수 있도록 Move() 함수를 부여한다.
            foreach (IPerson person in people) //리스트에서 하나씩 꺼낸다.
            {
                person.Move(); //행동 부여
            }
        }
    }

    class Human : IPerson
    {
        public void Move()
        {
            Debug.Log("Move!!");
        }
    }
    public class InterfaceMini : MonoBehaviour
    {
        void Start()
        {
            List<IPerson> list = new List<IPerson>();
            list.Add(new Human());
            list.Add(new Human());
            list.Add(new Human());

            StageManager stageManager = new StageManager(list);
        }
    }
}
예시3 -다중 인터페이스 사용
using System.Collections;
using System.Collections.Generic;
using UnityEngine;

namespace Interface2
{
    interface IPlayPerson
    {
        void Play();
    }
    interface IStudyPerson
    {
        void Study();
    }

    class MyPerson : IPlayPerson
    {
        public void Play()
        {

        }
    }

    class MyPerson2 : IStudyPerson
    {
        public void Study()
        {

        }
    }

    class MyPerson3 : IPlayPerson, IStudyPerson //다중 인터페이스를 쓴다고 선언할 수 있다. 이럴 경우 모든 인터페이스의 함수를 써야한다.
    {
        public void Play()
        {

        }
        public void Study()
        {

        }
    }
    class PersonManager
    {
        public void Play(IPlayPerson person)
        {
            person.Play();
        }

        public void Study(IStudyPerson person)
        {
            person.Study();
        }

        public void PlayAndStudy()
        {

        }
    }
    public class Interface2 : MonoBehaviour
    {
        void Start()
        {
            MyPerson myPerson = new MyPerson();
            MyPerson2 myPerson2 = new MyPerson2();
            MyPerson3 myPerson3 = new MyPerson3();

            myPerson.Play();

            myPerson2.Study();

            myPerson3.Play();
            myPerson3.Study(); //인터페이스 다중 상속으로 두 메서드 모두 사용 가능

            PersonManager personManager = new PersonManager();
            personManager.Play(myPerson);
            personManager.Play(myPerson3); //Play를 할 수 있는 객체는 1, 3번째 객체이다.

            personManager.Study(myPerson2);
            personManager.Study(myPerson3); //Study를 할 수 있는 객체는 2, 3번째 객체이다.
        }
    }
}
예시4
using System.Collections;
using System.Collections.Generic;
using UnityEngine;

namespace Interface3
{
    public interface ICharater //이 인터페이스를 상속 받은 객체는 아래의 모든 함수를 구현해야 한다.
    {
        void Spawn(); //캐릭터 등장할 때 호출되는 메서드
        void Move(); //캐릭터가 이동할 때 호출되는 메서드
        void Run(); //캐릭터가 달릴 때 호출되는 메서드
        void Destroy(); //캐릭터가 소멸할 때 호출되는 메서드
    }
    public class Interface3 : MonoBehaviour
    {
        public ICharater[] characters; //배열 선언
        void Start()
        {
            foreach(var character in characters)
            {
                character.Spawn();
            }
        }
    }
}
using Interface3;
using System.Collections;
using System.Collections.Generic;
using UnityEngine;
public class CharaterA : MonoBehaviour, ICharater //ICharater 인터페이스도 상속받는다. alt + Enter키로 모든 함수를 불러올 수 있다.
{
public void Destroy()
{
}
public void Move()
{
}
public void Run()
{
}
public void Spawn()
{
}
void Start()
{
}
void Update()
{
}
}
B가 자신을 호출한 A에게 Say함수를 호출하는 방법(새로운 A 객체 생성하지 않고)
using System.Collections;
using System.Collections.Generic;
using UnityEngine;

namespace Interface4
{
    class A
    {
        public void MakeB()
        {
            B b = new B(); //b 객체 생성
            b.Talk(this); //클래스 B에서 정의된 Talk 함수를 사용할 수 있다.
        }

        public void Say()
        {
            Debug.Log("말해!(Horse and Sun)");
        }
    }

    class B
    {
        public void Talk(A a)
        {
            Debug.Log("Talk");
            a.Say();
        }
    }

    public class Interface4 : MonoBehaviour
    {
        void Start()
        {
            A a = new A();
            a.MakeB(); //b 객체 생성
        }
    }
}
매개 변수를 이용한다.
퀴즈)
B객체는 자신의 Talk() 함수를 호출하는 C 객체에게도 Say()를 호출하는 형태로 구현하려면 어떻게 해야 할까요?
(A, C 객체 모두에게 Talk() 함수를 호출해야 합니다.)
namespace Interface4
{
    class A
    {
        public void MakeB()
        {
            B b = new B();
            b.Talk(this);           // A가 B에게 Talk를 시킴!!
        }

        public void Say()
        {
            Debug.Log("Say");
        }
    }

    class B
    {
        public void Talk(A a)
        {
            Debug.Log("Talk");
            a.Say();
        }
    }

    class C
    {
        public void Say()
        {
            Debug.Log("Say~~~ Ho~ Ho~~");
        }
    }

    public class Interface4 : MonoBehaviour
    {
        // Start is called before the first frame update
        void Start()
        {
            A a = new A();
            a.MakeB();
        }
    }
}
정답(인터페이스를 사용한다.)
using System.Collections;
using System.Collections.Generic;
using UnityEngine;

namespace Interface4
{
    interface ISay
    {
        void Say();
    }
    class A : ISay //인터페이스를 준수하겠다.
    {
        public void MakeB()
        {
            B b = new B(); //b 객체 생성
            b.Talk(this); //클래스 B에서 정의된 Talk 함수를 사용할 수 있다.
        }

        public void Say()
        {
            Debug.Log("말해!(Horse and Sun)");
        }
    }

    class B
    {
        public void Talk(ISay say)
        {
            Debug.Log("Talk");
            say.Say();
        }
    }

    class C : ISay
    {
        public void MakeB()
        {
            B b = new B();
            b.Talk(this);
        }

        public void Say()
        {
            Debug.Log("세이 예~~~~~~~~~~");
        }
    }

    public class Interface4 : MonoBehaviour
    {
        void Start()
        {
            A a = new A();
            a.MakeB(); //b 객체 생성
        }
    }
}
추상클래스
상속을 통해서 특정 메서드가 구현되어야 한다. 인터페이스와 비슷하기도 하다. 가장 큰 차이점은 인터페이스는 구현부를 가질 수 없었는데, 추상클래스는 일부 메소드에서 내용을 미리 구현해 놓을 수 있다.
using AbstractClass;
using System.Collections;
using System.Collections.Generic;
using UnityEngine;

namespace AbstractClass
{
    abstract class AbstractBase //추상 클래스
    {
        protected void PrivateMethodA()
        {
            Debug.Log("AbstractBase.PrivateMethodA()");
        }

        public void PublicMethodA()
        {
            Debug.Log("AbsdtractBase.PublicMethodA()");
        }

        public abstract void AbstractMethodA(); //추상 메서드가 항상 구현되어 있을 거라고 생각할 수 있다.
    }

    class Derived : AbstractBase //상속을 통해서 특정 메서드가 구현되어야 한다.
    {
        public override void AbstractMethodA()
        {
            Debug.Log("Derived.AbstractMethodA()");
            PrivateMethodA();
        }
    }

    public class AbstractClass : MonoBehaviour
    {
        void Start()
        {
            AbstractBase obj = new Derived();
            obj.AbstractMethodA();
            obj.PublicMethodA();
        }
    }
}
프로퍼티
값을 저장하는 용도로 사용된다.
"접근 한정자 + 자료형 + 이름" 형태
public string Name
{
    get { return name; }
    set { name = value; }
}
프로퍼티 예제
using System;
using System.Collections;
using System.Collections.Generic;
using UnityEngine;

namespace Property
{
    class BirthdayInfo
    {
        private string name; //접근할 수 없는 멤버변수 객체 외부에서 접근이 불가능하다. 클래스 안에서는 접근 가능
        private DateTime birthday;

        public string Name
        {
            get { return name; } //멤버변수 name. 프로퍼티 Name에 접근을 하면 name을 반환한다.
            set { name = value; }
        }

        public DateTime Birthday
        {
            get { return birthday; }
            set { birthday = value; }
        }

        public int Age //get만 쓰여져있을 때는 읽기 전용이다.
        {
            get
            { return new DateTime(DateTime.Now.Subtract(birthday).Ticks).Year; }
        }
        public class Property : MonoBehaviour
        {
            void Start()
            {
                BirthdayInfo birth = new BirthdayInfo();
                birth.Name = "서현역"; //값을 입력할 때는 Set이 작동한다.
                birth.Birthday = new DateTime(1991, 6, 28);

                Debug.Log($"Name : {birth.Name}");
                Debug.Log($"Birthday : {birth.Birthday.ToShortDateString()}");
                Debug.Log($"Age : {birth.Age}");
            }
        }
    }
}
**밑의 예시는 둘 다 같지만 private으로 두면 Inspector창에서만 수정이 가능하다.
[SerializeField] private GameObject obj;
public GameObject obj;
프로퍼티 예제2
using System;
using System.Collections;
using System.Collections.Generic;
using UnityEngine;

namespace Property
{
    class BirthdayInfo
    {
        private string name; //접근할 수 없는 멤버변수 객체 외부에서 접근이 불가능하다. 클래스 안에서는 접근 가능
        private DateTime birthday;

        public string Name
        {
            get { return name; } //멤버변수 name. 프로퍼티 Name에 접근을 하면 name을 반환한다.
            set { name = value; }
        }

        public DateTime Birthday
        {
            get { return birthday; }
            set { birthday = value; }
        }

        public int Age //get만 쓰여져있을 때는 읽기 전용이다.
        {
            get
            { return new DateTime(DateTime.Now.Subtract(birthday).Ticks).Year; }
        }
        public class Property : MonoBehaviour
        {
            void Start()
            {
                BirthdayInfo birth = new BirthdayInfo();
                birth.Name = "서현역"; //값을 입력할 때는 Set이 작동한다.
                birth.Birthday = new DateTime(1991, 6, 28);

                Debug.Log($"Name : {birth.Name}");
                Debug.Log($"Birthday : {birth.Birthday.ToShortDateString()}");
                Debug.Log($"Age : {birth.Age}");

                Person person = new Person();
                person.FirstName = "홍";
                person.LastName = "길동";

                person.Age = 30; //변수처럼 사용될 수 있다.
                person.Age += 2;
            }
        }
    }

    class Person
    {
        private int age;

        public string FirstName
        {
            get; set;
        }

        public string LastName
        {
            get; set;
        }

        public string FullName //이런 형태도 가능하다.
        {
            get { return FirstName + " " + LastName; }
        }

        public int Age
        {
            get; set;
        }
    }
}
프로퍼티와 생성자
using System;
using System.Collections;
using System.Collections.Generic;
using UnityEngine;

namespace ConstructorWithProperty
{
    class BirthdayInfo
    {
        public required string Name { get; set; } //required는 반드시 초기화 되도록 강제한다. 유니티에서는 사용 불가능
        public DateTime Birthday { get; set; }
        public int Age
        {
            get { return new DateTime(DateTime.Now.Subtract(Birthday).Ticks).Year; }
        }
    }
    public class ConstructorWithProperty : MonoBehaviour
    {
        void Start()
        {
            BirthdayInfo birth = new BirthdayInfo() //원하는 프로퍼티만 초기화 또는 전체 초기화 가능.
            {
                Name = "서현",
                Birthday = new DateTime(1991, 6, 28)
            };

            Debug.Log($"Name : {birth.Name}");
            Debug.Log($"Birthday : {birth.Birthday.ToShortDateString()}");
            Debug.Log($"Age : {birth.Age}");
        }
    }
}
레코드 선언하기
참조 형식이면서 값 형식의 특징도 가지고 있다. 값을 비교할 때 참조 형식에서는 객체 각각의 값이 아닌 참조값을 비교하는데, Record는 각각의 값을 비교한다. 값을 비교할 때도 복사된 형태의 값을 전달하기도 한다.
using System.Collections;
using System.Collections.Generic;
using UnityEngine;

namespace Record
{
    record RTansaction
    {
        //프로퍼티
        public string From { get; set; }
        public string To { get; set; }
        public int Amount { get; set; }
        //메소드
        public override string ToString()
        {
            return $"{From,-10} -> {To,-10} : ${Amount}"; //-10은 출력시 공백을 의미한다.
        }
        public class Record : MonoBehaviour
        {
            void Start()
            {
                RTansaction tr1 = new RTansaction
                {
                    From = "Alice",
                    To = "Bob",
                    Amount = 100
                };
                RTansaction tr2 = new RTansaction
                {
                    From = "Alice",
                    To = "Charlie",
                    Amount = 100
                };

                Debug.Log(tr1);
                Debug.Log(tr2) ;
            }
        }
    }
}
With를 이용한 레코드 복사
using System.Collections;
using System.Collections.Generic;
using UnityEngine;

namespace Record
{
    record RTansaction
    {
        //프로퍼티
        public string From { get; set; }
        public string To { get; set; }
        public int Amount { get; set; }
        //메소드
        public override string ToString()
        {
            return $"{From,-10} -> {To,-10} : ${Amount}"; //-10은 출력시 공백을 의미한다.
        }
        public class Record : MonoBehaviour
        {
            void Start()
            {
                RTansaction tr1 = new RTansaction
                {
                    From = "Alice",
                    To = "Bob",
                    Amount = 100
                };
                RTansaction tr2 = new RTansaction
                {
                    From = "Alice",
                    To = "Charlie",
                    Amount = 100
                };
                RTansaction tr3 = tr2 with { From = "Dave", Amount = 30 }; //With를 이용해서 값을 바꿨다.
            }
        }
    }
}
레코드 객체 비교하기
using System.Collections;
using System.Collections.Generic;
using UnityEngine;

namespace Record
{
    class CTransaction
    {
        public string From { get; set; }
        public string To { get; set; }
        public int Amount { get; set; }

        public override string ToString()
        {
            return $"{From,-10} -> {To,-10} : {Amount}";
        }
    }
    record RTansaction
    {
        //프로퍼티
        public string From { get; set; }
        public string To { get; set; }
        public int Amount { get; set; }
        //메소드
        public override string ToString()
        {
            return $"{From,-10} -> {To,-10} : ${Amount}"; //-10은 출력시 공백을 의미한다.
        }
        public class Record : MonoBehaviour
        {
            void Start()
            {
                CTransaction trA = new CTransaction //객체 trA
                {
                    From = "Alice",
                    To = "Bob",
                    Amount = 100
                };

                CTransaction trB = new CTransaction //객체 trB
                {
                    From = "Alice",
                    To = "Bob",
                    Amount = 100
                };

                Debug.Log(trA);
                Debug.Log(trB);

                if (trA == trB)
                    Debug.Log($"trA == trB");
                else
                    Debug.Log($"trA != trB");

                if (trA.Equals(trB))
                    Debug.Log($"trA.Equals(trB) => True");
                else
                    Debug.Log($"trA.Equals(trB) => False");

                RTansaction tr1 = new RTansaction
                {
                    From = "Alice",
                    To = "Bob",
                    Amount = 100
                };
                RTansaction tr2 = new RTansaction
                {
                    From = "Alice",
                    To = "Charlie",
                    Amount = 100
                };

                Debug.Log(tr1);
                Debug.Log(tr2);

                if(tr1 == tr2)
                    Debug.Log($"tr1 == tr2");
                else
                    Debug.Log($"tr1 != tr2");

                if (tr1.Equals(tr2))
                    Debug.Log($"tr1.Equals(tr2) => True");
                else
                    Debug.Log($"tr1.Equals(tr2) => False");
            }
        }
    }
}
무명 형식
형식의 선언과 동시에 인스턴스를 할당한다. 인스턴스를 만들고 다시는 사용하지 않을 때 무명 형식이 요긴하다. 두 개 이상의 인스턴스를 만들려면 class나 struct를 이용해 이름을 가진 형식을 별도로 만들어야하는데 그렇지 않아도 된다.
무명 형식의 프로퍼티에 할당된 값을 변경 불가능하다. 인스턴스가 만들어진 다음에는 읽기만 할 수 있다는 말.
using System.Collections;
using System.Collections.Generic;
using UnityEngine;
using UnityEngine.SocialPlatforms.Impl;

namespace AnonymousType
{
    public class AnonymousType : MonoBehaviour
    {
        void Start()
        {
            var a = new { Name = "이름", Age = 123 }; //중괄호 사이에 임의의 프로퍼티 이름을 적고 값을 할당하면 그대로 새 형식의 프로퍼티가 된다.
            Debug.Log($"Name:{a.Name}, Age:{a.Age}");

            var b = new { Subject = "수학", Scores = new int[] { 90, 80, 70, 60 } };

            Debug.Log($"Subject:{b.Subject}, Scores: ");
            foreach(var score in b.Scores)
            {
                Debug.Log($"{score}");
            }
        }
    }
}
추상클래스의 프로퍼티
using System.Collections;
using System.Collections.Generic;
using UnityEngine;
using System;

namespace PropertiesInAbstractClass
{
    abstract class Product
    {
        private static int serial = 0;
        public string SerialID
        {
            get { return string.Format("{0:d5}", serial++); }
        }

        abstract public DateTime ProductDate //abstract가 붙게 되면 인터페이스와 마찬가지로 자동 생성 프로퍼티가 되지 않는다. 자식 클래스에서 재구현 해야 한다.
        {
            get; set;
        }
    }

    class MyProduct : Product
    {
        public override DateTime ProductDate { get; set; }
    }

    public class PropertiesInAbstractClass : MonoBehaviour
    {
        void Start()
        {
            Product product_1 = new MyProduct()
            {
                ProductDate = new DateTime(2023, 1, 10)
            };

            Debug.Log($"Product:{product_1.SerialID}, Product Date: {product_1.ProductDate}");

            Product product_2 = new MyProduct()
            {
                ProductDate = new DateTime(2023, 2, 3)
            };
            Debug.Log($"Product: {product_2.SerialID}, Product Date: {product_2.ProductDate}");
        }
    }
}
배열
배열 예제
using System.Collections;
using System.Collections.Generic;
using UnityEngine;

public class ArraySample : MonoBehaviour
{
    void Start()
    {
        int[] scores = new int[5];
        scores[0] = 80;
        scores[1] = 74;
        scores[2] = 81;
        scores[3] = 90;
        scores[4] = 34;

        foreach (int score in scores)
            Debug.Log(score);

        int sum = 0;

        foreach(int score in scores)
            sum += score;

        int average = sum / scores.Length;

        Debug.Log($"Average Score : {average}");
    }
}
**배열의 크기를 정하지 않아도 값의 개수에 따라 생성된다.
int[] scores2 = new int[] { 80, 74, 81, 90, 34 };
배열 예제 2
using System.Collections;
using System.Collections.Generic;
using UnityEngine;
using System;

namespace MoreOnArray
{
    public class MoreOnArray : MonoBehaviour
    {
        private static bool CheckPassed(int score)
        {
            return score >= 60;
        }

        private static void Print(int value)
        {
            Debug.Log($"{value} ");
        }
        void Start()
        {
            int[] scores = new int[] { 80, 74, 81, 90, 34 };

            foreach(int score in scores)
            {
                Debug.Log($"{score}");
            }

            Array.Sort( scores ); //Sort : 배열을 정렬한다.
            Array.ForEach<int>(scores, new Action<int>(Print));

            Debug.Log($"Number of dimensions : {scores.Rank}"); //Rank : 배열의 차원을 반환한다.

            Debug.Log($"Binary Search : 81 is at " + $"{Array.BinarySearch<int>(scores, 81)}"); //BinarySearch : 2진탐색 방식. 효율이 좋다.
            Debug.Log($"Linary Search : 90 is at " + $"{Array.IndexOf<int>(scores, 90)}"); //IndexOf : 배열의 요소를 처음부터 찾는 방식
            Debug.Log($"Everyone passed ? : " + $"{Array.TrueForAll<int>(scores, CheckPassed)}"); //배열에 있는 모든 요소가 특정한 조건에 부합되는지 확인.

            int index = Array.FindIndex<int>(scores, (score) => score < 60); //FindIndex : 특정 값을 찾는 형태 여기서는 60보다 작은 요소

            scores[index] = 61;
            Debug.Log($"Everyone passed ? : " + $"{Array.TrueForAll<int>(scores, CheckPassed)}"); //배열의 모든 요소가 0보다 큰가? 크면 반환.

            Debug.Log("Old lenght of scores : " + $"{scores.GetLength(0)}");

            Array.Resize<int>(ref scores, 10); //Resize : 배열의 크기를 조정한다. 여기서는 10만큼 커짐.
            Debug.Log($"New length of scores : {scores.Length}");

            Array.ForEach<int>(scores, new Action<int>(Print));

            Array.Clear(scores, 3, 7);
            Array.ForEach<int>(scores, new Action<int>(Print));

            int[] sliced = new int[3];
            Array.Copy(scores, 0, sliced, 0, 3); //Copy : 기존 배열 복사
            Array.ForEach<int>(sliced, new Action<int>(Print));
        }
    }
}'SKKU DT' 카테고리의 다른 글
| [SKKU DT] 27일차 -유니티 미니 프로젝트(로봇 팔 시뮬레이션)(2) (1) | 2023.12.05 |
|---|---|
| [SKKU DT] 26일차 -유니티 미니 프로젝트(로봇 팔 시뮬레이션) (1) | 2023.12.05 |
| [SKKU DT] 24일차 -유니티 C# 클래스 (생성자, this, static, 상속, 오버라이딩, 구조체) (1) | 2023.11.30 |
| [SKKU DT] 23일차 -유니티 C# 메소드와 매개변수 (0) | 2023.11.29 |
| [SKKU DT] 23일차 -유니티 C# 계산기 만들기 (0) | 2023.11.29 |