[SKKU DT] 44일차 -유니티 스택(Stack), 큐(Queue), 스택을 이용한 팝업 예제, 일반화 프로그래밍, 배열(Ar
[SKKU DT] 43일차 -유니티 오브젝트 풀(Object Pool) 3D -공간 디자인, 라이팅, 3D 오브젝트 UI -Autolayout, TableView 서버 -JSON 배포 -Window-인스톨러/Web-최적화/Mobile-최적화,배포 데이터처리 C# -자료구조, 알고
lightbakery.tistory.com
지난 시간에 이어서...
ArraySort 스크립트를 다음과 같이 완성하면, if(p6.Equals(p7))에 의해서 "다름"이라는 값이 출력된다.
using System.Collections;
using System.Collections.Generic;
using UnityEngine;
using System;

class Person : IComparable<Person> //인터페이스 추가
{
    public string Name { get; private set; }
    public int Age {  get; private set; }
    public string Id { get; private set; }

    public Person(string name, int age, string id)
    {
        this.Name = name;
        this.Age = age;
        this.Id = id;
    }

    public int CompareTo(Person other) //"Ctrl + ."으로 자동 완성
    {
        if(other == null) return 1;
        else return this.Age.CompareTo(other.Age);
    }
}

public class ArraySort : MonoBehaviour
{
    void Start()
    {
        Person p1 = new Person("홍길동", 23, "001");
        Person p2 = new Person("김길동", 33, "002");
        Person p3 = new Person("최길동", 31, "003");
        Person p4 = new Person("고길동", 28, "004");
        Person p5 = new Person("마길동", 27, "005");
        Person p6 = new Person("박길동", 36, "006");
        Person p7 = new Person("우길동", 42, "007");

        List<Person> list = new List<Person> { p1, p2, p3, p4, p5, p6, p7 };

        list.Sort(); //정렬

        int result = binaryAgeSearch(list.ToArray(), 36); //괄호 안에 찾고자 하는 정보 검색

        list.Sort(new Comparison<Person>((n1, n2) => n1.Name.CompareTo(n2.Name))); //정렬. n1의 이름과 n2의 이름 비교

        int result2 = binaryNameSeach(list.ToArray(), "우길동", 0, list.ToArray().Length - 1);

        Person p8 = new Person("윤길동", 34, "008"); //새로운 값 생성

        if (p6.Equals(p7))
        {
            Debug.Log("같음");
        }
        else
        {
            Debug.Log("다름");
        }
    }

    int binaryAgeSearch(Person[] persons, int age) //나이로 정렬
    {
        int low = 0, high = persons.Length - 1;
        int mid;

        while(low <= high)
        {
            mid = (low + high) / 2;

            if (persons[mid].Age == age)
            {
                return mid;
            }
            else if (persons[mid].Age > age)
            {
                high = mid - 1;
            }
            else
            {
                low = mid + 1;
            }
        }
        return -1;
    }

    int binaryNameSeach(Person[] persons, string name, int myLow, int myHigh) //이름으로 정렬
    {
        if (myLow > myHigh) return -1;
        if (name == null) return -1;

        int mid = myLow + (myHigh - myLow) / 2;

        if (persons[mid].Name.CompareTo(name) == 0)
        {
            return mid;
        }
        else if (persons[mid].Name.CompareTo(name) > 0)
        {
            myHigh = mid - 1;
            return binaryNameSeach(persons, name, myLow, myHigh); //재귀 함수
        }
        else
        {
            myLow = mid + 1;
            return binaryNameSeach(persons, name, myLow, myHigh); //재귀 함수
        }
    }
}
IEquatable 인터페이스 추가, Equals 메서드 구현
using System.Collections;
using System.Collections.Generic;
using UnityEngine;
using System;

class Person : IComparable<Person>, IEquatable<Person> //인터페이스 추가. 인터페이스는 클래스 상속과는 다르게 여러개를 상속받을 수 있다.
{
    public string Name { get; private set; }
    public int Age {  get; private set; }
    public string Id { get; private set; }

    public Person(string name, int age, string id)
    {
        this.Name = name;
        this.Age = age;
        this.Id = id;
    }

    public int CompareTo(Person other) //"Ctrl + ."으로 자동 완성
    {
        if(other == null) return 1;
        else return this.Age.CompareTo(other.Age);
    }

    public bool Equals(Person other) //인터페이스 자동 생성. System 네임스페이스에 들어있기 때문에 가져다 쓰면 됨. CampareTo도 마찬가지.
    {
        //throw new NotImplementedException(); //인터페이스 자동 생성 때 만들어지지만 없애고 필요한 코드를 적어야 한다.
        if(other == null) return false;

        return Equals(this.Id, other.Id);
    }
}

public class ArraySort : MonoBehaviour
{
    void Start()
    {
        Person p1 = new Person("홍길동", 23, "001");
        Person p2 = new Person("김길동", 33, "002");
        Person p3 = new Person("최길동", 31, "003");
        Person p4 = new Person("고길동", 28, "004");
        Person p5 = new Person("마길동", 27, "005");
        Person p6 = new Person("박길동", 36, "006");
        Person p7 = new Person("우길동", 42, "007");

        List<Person> list = new List<Person> { p1, p2, p3, p4, p5, p6, p7 };

        list.Sort(); //정렬

        int result = binaryAgeSearch(list.ToArray(), 36); //괄호 안에 찾고자 하는 정보 검색

        list.Sort(new Comparison<Person>((n1, n2) => n1.Name.CompareTo(n2.Name))); //정렬. n1의 이름과 n2의 이름 비교

        int result2 = binaryNameSeach(list.ToArray(), "우길동", 0, list.ToArray().Length - 1);

        Person p8 = new Person("박길동", 34, "008"); //새로운 값 생성

        if (p6.Equals(p8))
        {
            Debug.Log("같음");
        }
        else
        {
            Debug.Log("다름");
        }
    }

    int binaryAgeSearch(Person[] persons, int age) //나이로 정렬
    {
        int low = 0, high = persons.Length - 1;
        int mid;

        while(low <= high)
        {
            mid = (low + high) / 2;

            if (persons[mid].Age == age)
            {
                return mid;
            }
            else if (persons[mid].Age > age)
            {
                high = mid - 1;
            }
            else
            {
                low = mid + 1;
            }
        }
        return -1;
    }

    int binaryNameSeach(Person[] persons, string name, int myLow, int myHigh) //이름으로 정렬
    {
        if (myLow > myHigh) return -1;
        if (name == null) return -1;

        int mid = myLow + (myHigh - myLow) / 2;

        if (persons[mid].Name.CompareTo(name) == 0)
        {
            return mid;
        }
        else if (persons[mid].Name.CompareTo(name) > 0)
        {
            myHigh = mid - 1;
            return binaryNameSeach(persons, name, myLow, myHigh); //재귀 함수
        }
        else
        {
            myLow = mid + 1;
            return binaryNameSeach(persons, name, myLow, myHigh); //재귀 함수
        }
    }
}
Equals 메서드에 의해 같은 이름을 비교하면 "같음"이 출력되어야 한다.
Hashtable
key와 value를 가지는 형태.
Index를 사용하는 것은 ArrayList(object), List<T>가 있고
Key를 사용하는 기능은 HashTable(object), Dictionary<T>가 있다.
Index를 쓰면 여러 값 중 일부가 누락되면 뒤의 Index 값이 앞으로 땡겨져 오기 때문에 Key를 사용하여 관리하면 좋다.
예를 들어 이름, 전화번호, 주소를 가진 연락처가 있다고 하면 이름, 전화번호, 주소는 Key로, 연락처 목록은 Index로 관리한다.
Hashtable 예시
using System.Collections;
using System.Collections.Generic;
using UnityEngine;

public class UsingHashTable : MonoBehaviour
{
    void Start()
    {
        Hashtable ht = new Hashtable();
        ht["하나"] = "one";
        ht["둘"] = "two";
        ht["셋"] = "three";
        ht["넷"] = "four";
        ht["다섯"] = "five";

        Debug.Log(ht["하나"]);
        Debug.Log(ht["둘"]);
        Debug.Log(ht["셋"]);
        Debug.Log(ht["넷"]);
        Debug.Log(ht["다섯"]);
    }
}
Dictionary 예시
using System.Collections;
using System.Collections.Generic;
using UnityEngine;

public class DictionarySample : MonoBehaviour
{
    void Start()
    {
        Dictionary<string, string> person1 = new Dictionary<string, string>();
        person1["Name"] = "홍길동";
        person1["Phone"] = "010-1234-5678";
        person1["Address"] = "경기도 안양시 동안구";

        Dictionary<string, string> person2 = new Dictionary<string, string>();
        person2["Name"] = "김길동";
        person2["Phone"] = "010-1234-0001";
        person2["Address"] = "경기도 부천시 평천로";

        Dictionary<string, string> person3 = new Dictionary<string, string>();
        person3["Name"] = "최길동";
        person3["Phone"] = "010-1234-0002";
        person3["Address"] = "경기도 성남시 분당구";

        List<Dictionary<string, string>> addressBook = new List<Dictionary<string, string>>();
        addressBook.Add(person1);
        addressBook.Add(person2);
        addressBook.Add(person3);
    }
}
불러오는 코드를 넣으면, addressBook의 0번째 인덱스를 가져와서 "홍길동"이 출력된다.
using System.Collections;
using System.Collections.Generic;
using UnityEngine;

public class DictionarySample : MonoBehaviour
{
    void Start()
    {
        Dictionary<string, string> person1 = new Dictionary<string, string>();
        person1["Name"] = "홍길동";
        person1["Phone"] = "010-1234-5678";
        person1["Address"] = "경기도 안양시 동안구";

        Dictionary<string, string> person2 = new Dictionary<string, string>();
        person2["Name"] = "김길동";
        person2["Phone"] = "010-1234-0001";
        person2["Address"] = "경기도 부천시 평천로";

        Dictionary<string, string> person3 = new Dictionary<string, string>();
        person3["Name"] = "최길동";
        person3["Phone"] = "010-1234-0002";
        person3["Address"] = "경기도 성남시 분당구";

        List<Dictionary<string, string>> addressBook = new List<Dictionary<string, string>>();
        addressBook.Add(person1);
        addressBook.Add(person2);
        addressBook.Add(person3);

        //불러오기
        Dictionary<string, string> dict = addressBook[0];
        Debug.Log(dict["Name"]);
    }
}
UI에 표시하기 위해서 패널을 생성한다.

바람개비 모양은 앵커(anchor), 가운데 원은 피봇(pivot)이다.
Text를 추가하고 Vertical Layout Group으로 정렬한다.

**Vertical Layout Group에서 Control Child Size의 Width와 Height를 체크하면 사이즈에 맞게 자식의 텍스트 크기가 조절된다.

CellController 스크립트 만들어서 Cell에 추가한다.

CellController 스크립트 작
using System.Collections;
using System.Collections.Generic;
using UnityEngine;
using UnityEngine.UI;

public class CellController : MonoBehaviour
{
    [SerializeField] Text nameText;
    [SerializeField] Text phoneText;
    [SerializeField] Text addressText;
    void Start()
    {
        //텍스트 초기화
        nameText.text = "";
        phoneText.text = "";
        addressText.text = "";
    }

    /// <summary>
    /// Dictionary 데이터를 전달하는 메서드
    /// </summary>
    /// <param name="data">Name, Phone, Address 정보가 들어가 Dictionary</param>
    public void SetData(Dictionary<string, string> data)
    {
        nameText.text = data["Name"]; //Name 키를 가지고 있는 값을 출력
        phoneText.text = data["Phone"];
        addressText.text = data["Address"];
    }
}
Cell 프리팹화
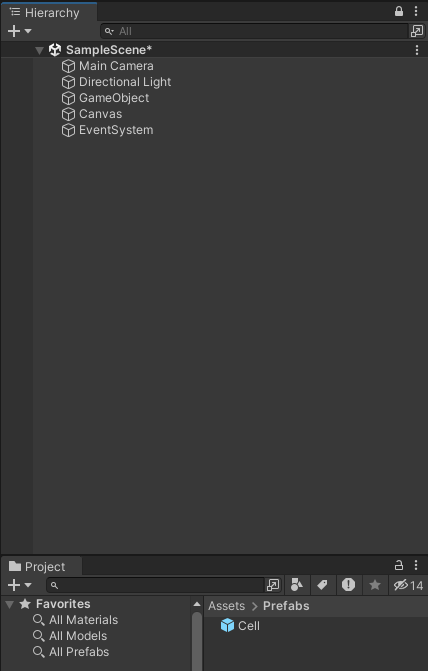
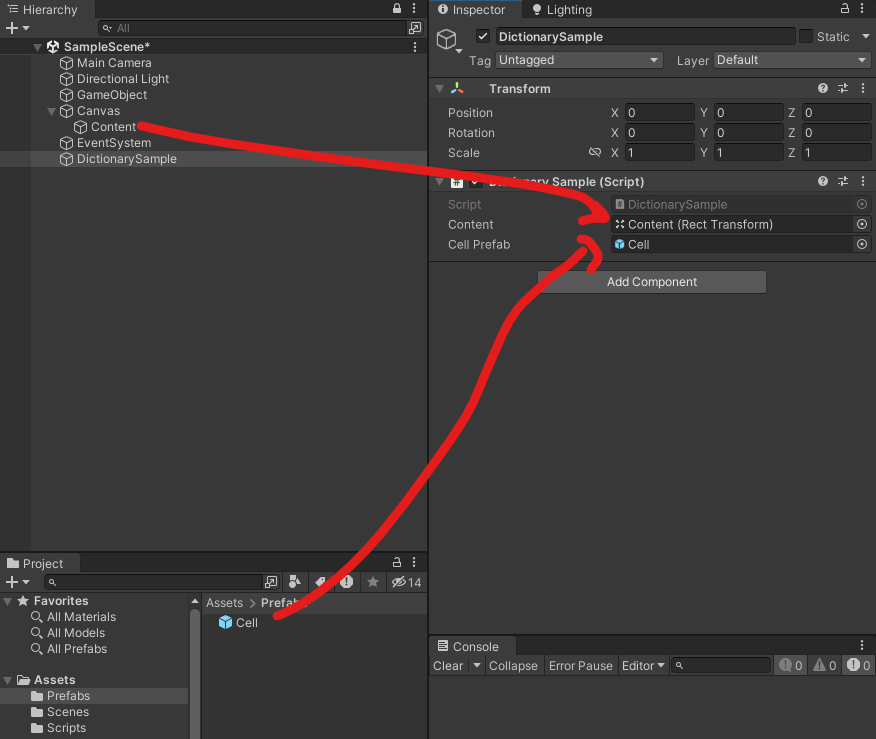
DictionarySample 빈 오브젝트 만들어서 Dictionary Sample 스크립트 추가

셀이 만들어질 Transfrom 값과 셀 프리팹을 가져올 GameObject의 SerializeField를 추가한다.
using System.Collections;
using System.Collections.Generic;
using UnityEngine;

public class DictionarySample : MonoBehaviour
{
    [SerializeField] Transform content;
    [SerializeField] GameObject cellPrefab;
    void Start()
    {
        Dictionary<string, string> person1 = new Dictionary<string, string>();
        person1["Name"] = "홍길동";
        person1["Phone"] = "010-1234-5678";
        person1["Address"] = "경기도 안양시 동안구";

        Dictionary<string, string> person2 = new Dictionary<string, string>();
        person2["Name"] = "김길동";
        person2["Phone"] = "010-1234-0001";
        person2["Address"] = "경기도 부천시 평천로";

        Dictionary<string, string> person3 = new Dictionary<string, string>();
        person3["Name"] = "최길동";
        person3["Phone"] = "010-1234-0002";
        person3["Address"] = "경기도 성남시 분당구";

        List<Dictionary<string, string>> addressBook = new List<Dictionary<string, string>>();
        addressBook.Add(person1);
        addressBook.Add(person2);
        addressBook.Add(person3);

        //불러오기
        Dictionary<string, string> dict = addressBook[0];
        Debug.Log(dict["Name"]);
    }
}
추가된 SerializeField에 각각 요소를 넣는다.
실행을 하면 정보가 나온다.

만약 나오지 않았다면 텍스트 초기화를 Start 함수가 아닌 Awake 함수에 넣으면 된다.
using System.Collections;
using System.Collections.Generic;
using UnityEngine;
using UnityEngine.UI;

public class CellController : MonoBehaviour
{
    [SerializeField] Text nameText;
    [SerializeField] Text phoneText;
    [SerializeField] Text addressText;
    void Awake()
    {
        //텍스트 초기화
        nameText.text = "";
        phoneText.text = "";
        addressText.text = "";
    }

    /// <summary>
    /// Dictionary 데이터를 전달하는 메서드
    /// </summary>
    /// <param name="data">Name, Phone, Address 정보가 들어가 Dictionary</param>
    public void SetData(Dictionary<string, string> data)
    {
        nameText.text = data["Name"]; //Name 키를 가지고 있는 값을 출력
        phoneText.text = data["Phone"];
        addressText.text = data["Address"];
    }
}
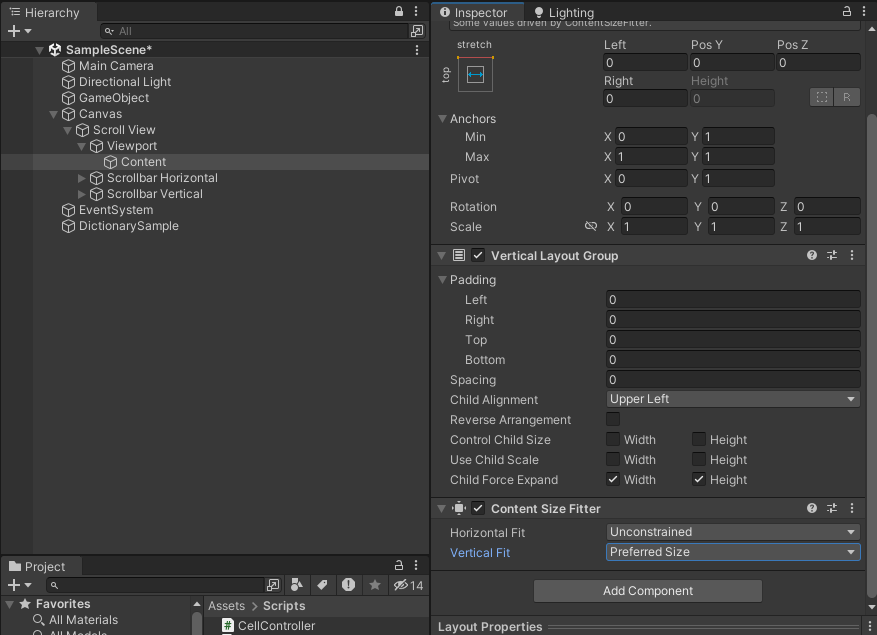
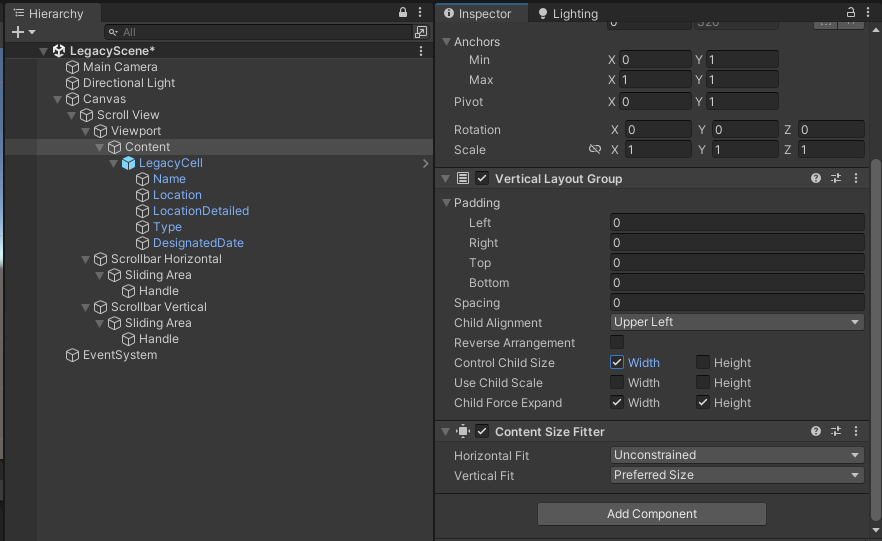
Content에는 Vertical Layout Group과 Content Size Fitter 컴포넌트를 설정한다.

앵커와 피봇은 중앙 상단으로.

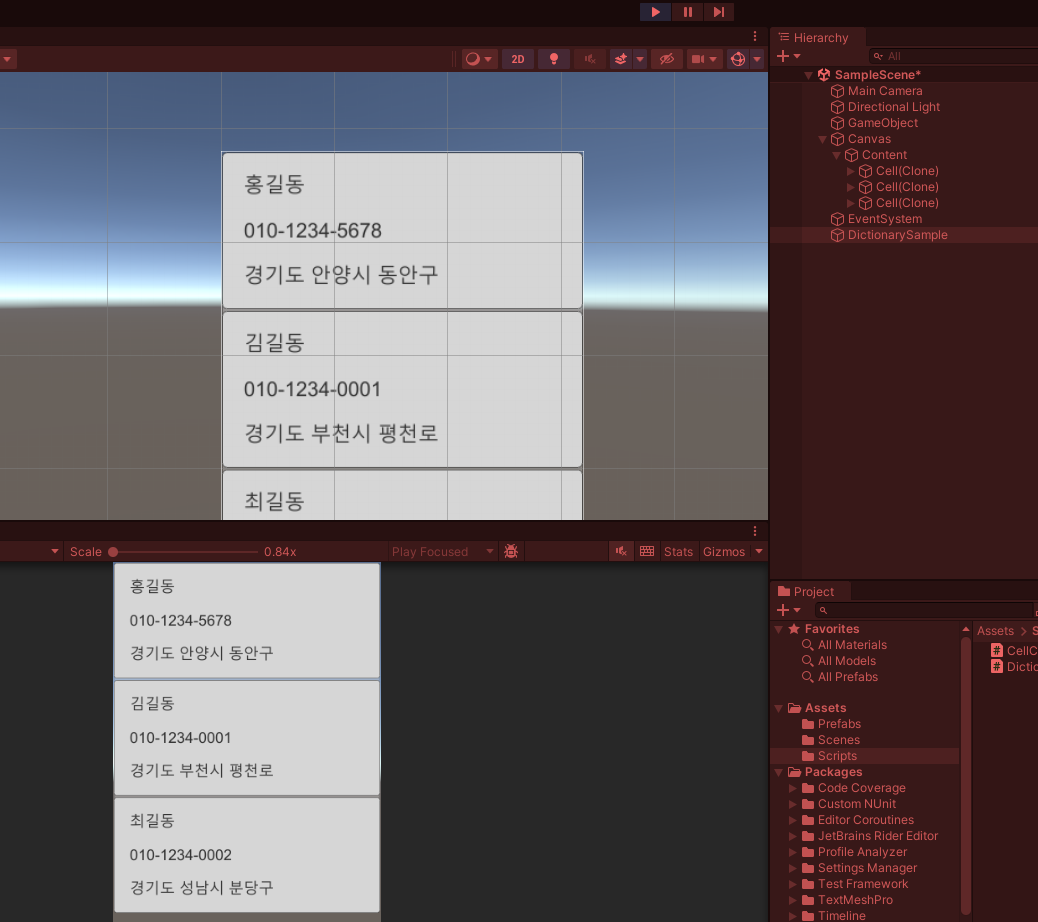
person1, 2, 3에 대한 정보를 모두 받아오는 코드로 셀을 더 생성하면,
using System.Collections;
using System.Collections.Generic;
using UnityEngine;

public class DictionarySample : MonoBehaviour
{
    [SerializeField] Transform content;
    [SerializeField] GameObject cellPrefab;
    void Start()
    {
        Dictionary<string, string> person1 = new Dictionary<string, string>();
        person1["Name"] = "홍길동";
        person1["Phone"] = "010-1234-5678";
        person1["Address"] = "경기도 안양시 동안구";

        Dictionary<string, string> person2 = new Dictionary<string, string>();
        person2["Name"] = "김길동";
        person2["Phone"] = "010-1234-0001";
        person2["Address"] = "경기도 부천시 평천로";

        Dictionary<string, string> person3 = new Dictionary<string, string>();
        person3["Name"] = "최길동";
        person3["Phone"] = "010-1234-0002";
        person3["Address"] = "경기도 성남시 분당구";

        List<Dictionary<string, string>> addressBook = new List<Dictionary<string, string>>();
        addressBook.Add(person1);
        addressBook.Add(person2);
        addressBook.Add(person3);

        //Cell 만들기
        GameObject cellObject1 = Instantiate(cellPrefab, content);
        CellController cellController1 = cellObject1.GetComponent<CellController>(); //CellController를 불러오기
        cellController1.SetData(person1); //person1 전달

        GameObject cellObject2 = Instantiate(cellPrefab, content);
        CellController cellController2 = cellObject2.GetComponent<CellController>(); //CellController를 불러오기
        cellController2.SetData(person2); //person1 전달

        GameObject cellObject3 = Instantiate(cellPrefab, content);
        CellController cellController3 = cellObject3.GetComponent<CellController>(); //CellController를 불러오기
        cellController3.SetData(person3); //person1 전달
    }
}
Content에 대한 설정을 했으므로 다음과 같이 화면에 딱 맞게 셀들이 나오게 된다.
기존의 Content 오브젝트는 지우고 Scroll View로 다시 만든다.

stretch로 화면에 꽉 차게 설정, Canvas는 Scale With Screen Size로 설정한다.

Scroll View안에는 Content가 있는데 여기에 아까 넣었던 Vertical Layout Group과 Content Size Fitter를 추가한다.
DictionarySample 안의 컴포넌트에서 Content를 Scroll View의 Content로 대체한다.

똑같이 잘 뜬다. 하지만 우리는 좌우로는 스크롤하지 않으므로 Scroll View에서 Horizontal을 체크해제한다.


이제 위아래로만 스크롤된다.

데이터를 늘리면 스크롤이 더 잘 보인다.
using System.Collections;
using System.Collections.Generic;
using UnityEngine;

public class DictionarySample : MonoBehaviour
{
    [SerializeField] Transform content;
    [SerializeField] GameObject cellPrefab;
    void Start()
    {
        Dictionary<string, string> person1 = new Dictionary<string, string>();
        person1["Name"] = "홍길동";
        person1["Phone"] = "010-1234-5678";
        person1["Address"] = "경기도 안양시 동안구";

        Dictionary<string, string> person2 = new Dictionary<string, string>();
        person2["Name"] = "김길동";
        person2["Phone"] = "010-1234-0001";
        person2["Address"] = "경기도 부천시 평천로";

        Dictionary<string, string> person3 = new Dictionary<string, string>();
        person3["Name"] = "최길동";
        person3["Phone"] = "010-1234-0002";
        person3["Address"] = "경기도 성남시 분당구";

        Dictionary<string, string> person4 = new Dictionary<string, string>();
        person4["Name"] = "이길동";
        person4["Phone"] = "010-1234-0002";
        person4["Address"] = "경기도 성남시 중원구";

        Dictionary<string, string> person5 = new Dictionary<string, string>();
        person5["Name"] = "박길동";
        person5["Phone"] = "010-1234-0002";
        person5["Address"] = "경기도 광주시 분당구";

        Dictionary<string, string> person6 = new Dictionary<string, string>();
        person6["Name"] = "송길동";
        person6["Phone"] = "010-1234-0002";
        person6["Address"] = "경기도 남양주시 분당구";

        List<Dictionary<string, string>> addressBook = new List<Dictionary<string, string>>();
        addressBook.Add(person1);
        addressBook.Add(person2);
        addressBook.Add(person3);
        addressBook.Add(person4);
        addressBook.Add(person5);
        addressBook.Add(person6);

        //Cell 만들기
        GameObject cellObject1 = Instantiate(cellPrefab, content);
        CellController cellController1 = cellObject1.GetComponent<CellController>(); //CellController를 불러오기
        cellController1.SetData(person1); //person1 전달

        GameObject cellObject2 = Instantiate(cellPrefab, content);
        CellController cellController2 = cellObject2.GetComponent<CellController>(); //CellController를 불러오기
        cellController2.SetData(person2); //person2 전달

        GameObject cellObject3 = Instantiate(cellPrefab, content);
        CellController cellController3 = cellObject3.GetComponent<CellController>(); //CellController를 불러오기
        cellController3.SetData(person3); //person3 전달

        GameObject cellObject4 = Instantiate(cellPrefab, content);
        CellController cellController4 = cellObject4.GetComponent<CellController>(); //CellController를 불러오기
        cellController4.SetData(person4); //person4 전달

        GameObject cellObject5 = Instantiate(cellPrefab, content);
        CellController cellController5 = cellObject5.GetComponent<CellController>(); //CellController를 불러오기
        cellController5.SetData(person5); //person5 전달

        GameObject cellObject6 = Instantiate(cellPrefab, content);
        CellController cellController6 = cellObject6.GetComponent<CellController>(); //CellController를 불러오기
        cellController6.SetData(person6); //person6 전달
    }
}
공공데이터포털 API 사용하기
https://www.data.go.kr/index.do
위의 사이트에서 제공하는 공공 데이터를 활용해본다. 로그인하고 원하는 JSON 형식의 API를 찾는다.
https://www.data.go.kr/data/3080236/fileData.do

활용신청 버튼을 누르고 사유를 입력하면 자동 승인의 경우 몇 분 후 승인이 난다.

[승인]이 된 것을 볼 수 있다.

상세보기의 인증키를 인증키 설정에 각각 복사해서 넣는다.
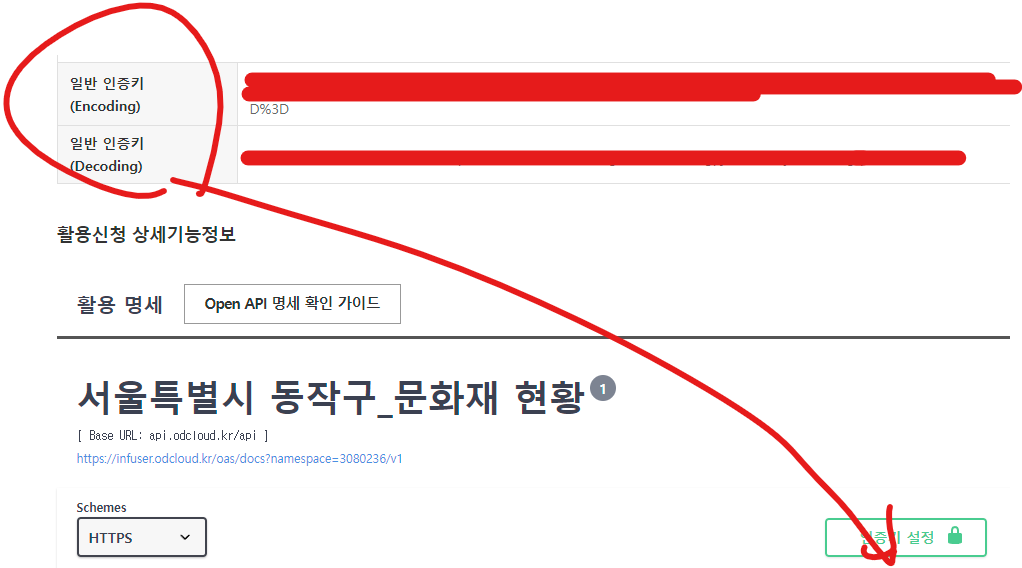

OpenAPI 실행 준비를 누르면,

OpenAPI 호출 버튼이 생기고 누르면,

두 가지 형태의 응답 형태를 볼 수 있다. 우리는 Request URL을 사용할 것이다.
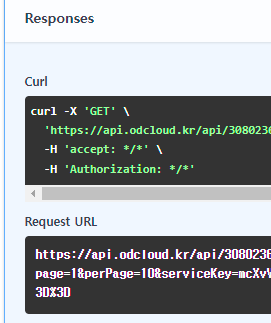
page1, perPage, serviceKey가 URL안에 들어있다. 이 URL은 밑에 postman에서 사용된다.
해당 Rest API가 정상 작동하는지는 postman을 이용하면 원활하게 개발할 수 있다.
Postman API Platform | Sign Up for Free
Postman is an API platform for building and using APIs. Postman simplifies each step of the API lifecycle and streamlines collaboration so you can create better APIs—faster.
www.postman.com
postman을 다운받고 로그인까지 한다. 그러면 아래와 같은 화면을 볼 수 있다.

Collection - New - HTTP 선택

GET 옆 빈 칸에 URL을 붙여넣기하고 Send 버튼을 누르면 정보를 볼 수 있다. page, perPage, serviceKey 값도 나오고, 내용이 쭉 나온다.

Pretty를 누르면 데이터를 정리된 모습으로 깔끔하게 볼 수 있다.

페이지 수를 바꾸면 2페이지의 내용을 볼 수 있다.

Json Parser Online
json.parser.online.fr
jsonparser online에서는 온라인 상에서 json을 어떻게 parsing 할 것인지 고민해볼 수 있다.

공공API 받아오기 코드 작성
Dictionary를 써도 되고 Class나 구조체로 사용해도 된다.
Class를 하나 만들고, "기준일", "명칭" 등 프로퍼티를 만들고, 생성자로 값을 할당할 수 있게 하고 객체들을 저장할 수 있는 List를 생성한다. 이후 유니티 Scroll View에다가 뿌려주면 된다.
이전 던전앤파이터 api 가져왔던 예시를 변형해볼까...
이전 스크립트 예시를 가져오면 일단 콘솔창에 문화재 목록 내용은 잘 뜬다!
using System.Collections;
using System.Collections.Generic;
using UnityEngine;
using UnityEngine.Networking;
using TMPro;
using System;


[System.Serializable]
public class ApiResponse
{
    public CharacterInfo[] rows;
}

[System.Serializable]
public class CharacterInfo
{
    public string characterName;
    public int level;
    public string jobName;
    public string jobGrowName;
    public int fame;
}

public class PublicAPI : MonoBehaviour
{
    public TMP_Text[] Text;

    void Start()
    {
        StartCoroutine(GetAPIData());
    }

    IEnumerator GetAPIData()
    {
        string url = $"API URL";

        using (UnityWebRequest webRequest = UnityWebRequest.Get(url))
        {
            yield return webRequest.SendWebRequest();

            if (webRequest.result != UnityWebRequest.Result.Success)
            {
                Debug.LogError("Error: " + webRequest.error);
                Text[0].text = "Error fetching character data";
            }
            else
            {
                ApiResponse apiData = JsonUtility.FromJson<ApiResponse>(webRequest.downloadHandler.text);
                //DisplayCharacterInfo(apiData);
                Debug.Log(webRequest.downloadHandler.text);
            }
        }
    }
}
이 API 예제에 맞게 스크립트를 수정했고,
using System.Collections;
using System.Collections.Generic;
using UnityEngine;
using UnityEngine.Networking;
using TMPro;
using System;

[System.Serializable]
public class ApiResponse
{
    public int currentCount;
    public CharacterInfo[] data;
}

[System.Serializable]
public class CharacterInfo
{
    public string 기준일;
    public string 명칭;
    public string 소재지_구;
    public string 소재지_상세;
    public int 연번;
    public string 종목;
    public string 지정일;
}

public class PublicAPI : MonoBehaviour
{
    public TMP_Text[] Text;

    void Start()
    {
        StartCoroutine(GetAPIData());
    }

    IEnumerator GetAPIData()
    {
        string url = "API URL";

        using (UnityWebRequest webRequest = UnityWebRequest.Get(url))
        {
            yield return webRequest.SendWebRequest();

            if (webRequest.result != UnityWebRequest.Result.Success)
            {
                Debug.LogError("Error: " + webRequest.error);
                Text[0].text = "Error fetching character data";
            }
            else
            {
                ApiResponse apiData = JsonUtility.FromJson<ApiResponse>(webRequest.downloadHandler.text);
                DisplayCharacterInfo(apiData);
            }
        }
    }

    void DisplayCharacterInfo(ApiResponse apiData)
    {
        if (apiData != null && apiData.data.Length > 0)
        {
            CharacterInfo firstCharacter = apiData.data[0];
            Text[0].text = $"명칭: {firstCharacter.명칭}\n";
            Text[1].text = $"소재지(구): {firstCharacter.소재지_구}\n";
            Text[2].text = $"소재지(상세): {firstCharacter.소재지_상세}\n";
            Text[3].text = $"종목: {firstCharacter.종목}\n";
            Text[4].text = $"지정일: {firstCharacter.지정일}\n";
        }
    }
}
데이터가 잘 불러와지긴 한다. 이제 이걸 리스트화 해서 셀이 생성됨과 동시에 정보가 나오도록 바꿔야 한다. 근데 소재지가 안나온다...
일단 아래와 같이 작성했지만 되진 않는다. apiData.data가 null이라고 뜬다...
using System.Collections;
using System.Collections.Generic;
using UnityEngine;
using UnityEngine.Networking;
using TMPro;
using System;

[System.Serializable]
public class ApiResponse
{
    public int currentCount;
    public List<Dictionary<string, string>> data;
}

public class PublicAPI : MonoBehaviour
{
    [SerializeField] Transform content;
    [SerializeField] GameObject cellPrefab;

    void Start()
    {
        StartCoroutine(GetAPIData());
    }

    IEnumerator GetAPIData()
    {
        string url = "API URL";

        using (UnityWebRequest webRequest = UnityWebRequest.Get(url))
        {
            yield return webRequest.SendWebRequest();

            if (webRequest.result != UnityWebRequest.Result.Success)
            {
                Debug.LogError("Error: " + webRequest.error);
                // Handle error
            }
            else
            {
                ApiResponse apiData = JsonUtility.FromJson<ApiResponse>(webRequest.downloadHandler.text);
                DisplayCharacterInfo(apiData);
                Debug.Log(webRequest.downloadHandler.text);
            }
        }
    }

    void DisplayCharacterInfo(ApiResponse apiData)
    {
        if (apiData.data == null)
        {
            Debug.LogError("apiData is null");
            return;
        }
        if (apiData.data != null && apiData.data.Count > 0)
        {
            foreach (var character in apiData.data)
            {
                // Create a new cell prefab for each character
                GameObject cellObject = Instantiate(cellPrefab, content);
                CellController cellController = cellObject.GetComponent<CellController>();
                cellController.SetData(character);
            }
        }
    }
}
밑에는 셀에 들어가는 스크립트이다.
using System.Collections;
using System.Collections.Generic;
using UnityEngine;
using UnityEngine.UI;

public class CellController : MonoBehaviour
{
    [SerializeField] Text legacyname;
    [SerializeField] Text location;
    [SerializeField] Text locationDetailed;
    [SerializeField] Text type;
    [SerializeField] Text designatedDate;
    void Awake()
    {
        //텍스트 초기화
        legacyname.text = "";
        location.text = "";
        locationDetailed.text = "";
        type.text = "";
        designatedDate.text = "";
    }

    public void SetData(Dictionary<string, string> data)
    {
        legacyname.text = data["명칭"];
        location.text = data["소재지(구)"];
        locationDetailed.text = data["소재지(상세)"];
        type.text = data["종목"];
        designatedDate.text = data["지정일"];
    }
}
대괄호와 중괄호로 이루어진 데이터를 처리하는 방법을 좀 알아야 될 것 같다.
보아하니 [System.Serializable]로 단계를 내려가는 것 같다.
Parsing을 다음과 같이 하니까 한 객체씩 정보가 나온다!
using System.Collections;
using System.Collections.Generic;
using UnityEngine;
using UnityEngine.Networking;
using TMPro;
using System;

[System.Serializable]
public class ApiResponse
{
    public int currentCount;
    public List<CharacterInfo> data;
    public int matchCount;
    public int page;
    public int perPage;
    public int totalCount;
}

[System.Serializable]
public class CharacterInfo
{
    public string 기준일;
    public string 명칭;
    public string 소재지_구;
    public string 소재지_상세;
    public int 연번;
    public string 종목;
    public string 지정일;
}

public class PublicAPI : MonoBehaviour
{
    [SerializeField] Transform content;
    [SerializeField] GameObject cellPrefab;

    void Start()
    {
        StartCoroutine(GetAPIData());
    }

    IEnumerator GetAPIData()
    {
        string url = "API URL";

        using (UnityWebRequest webRequest = UnityWebRequest.Get(url))
        {
            yield return webRequest.SendWebRequest();

            if (webRequest.result != UnityWebRequest.Result.Success)
            {
                Debug.LogError("Error: " + webRequest.error);
                // Handle error
            }
            else
            {
                ApiResponse apiData = JsonUtility.FromJson<ApiResponse>(webRequest.downloadHandler.text);
                DisplayCharacterInfo(apiData);
                Debug.Log(apiData.data);
            }
        }
    }

    void DisplayCharacterInfo(ApiResponse apiData)
    {
        if (apiData.data != null && apiData.data.Count > 0)
        {
            foreach (var character in apiData.data)
            {
                // Access character properties
                Debug.Log($"명칭: {character.명칭}, 소재지(구): {character.소재지_구}, 소재지(상세): {character.소재지_상세}, 종목: {character.종목}, 지정일: {character.지정일}");
            }
        }
    }
}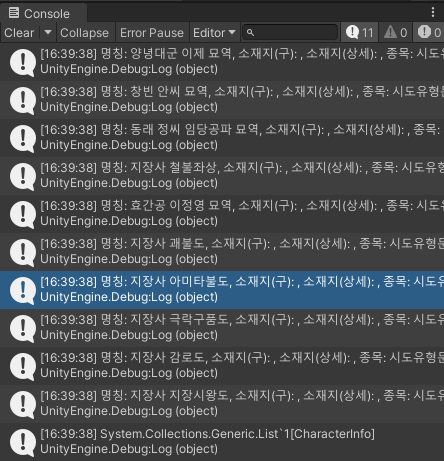
성공했다!!!!
Parsing을 어떻게 해서 데이터를 찾아가느냐에 길이 있었다. [System.Serializable]로 데이터에 진입하고 굳이 Dictionary를 사용하지 않고도 가능했다.
using System.Collections;
using System.Collections.Generic;
using UnityEngine;
using UnityEngine.Networking;
using TMPro;
using System;

[System.Serializable]
public class ApiResponse
{
    public int currentCount;
    public List<CharacterInfo> data;
    public int matchCount;
    public int page;
    public int perPage;
    public int totalCount;
}

[System.Serializable]
public class CharacterInfo
{
    public string 기준일;
    public string 명칭;
    public string 소재지_구;
    public string 소재지_상세;
    public int 연번;
    public string 종목;
    public string 지정일;
}

public class PublicAPI : MonoBehaviour
{
    [SerializeField] Transform content;
    [SerializeField] GameObject cellPrefab;

    void Start()
    {
        StartCoroutine(GetAPIData());
    }

    IEnumerator GetAPIData()
    {
        string url = "API URL";

        using (UnityWebRequest webRequest = UnityWebRequest.Get(url))
        {
            yield return webRequest.SendWebRequest();

            if (webRequest.result != UnityWebRequest.Result.Success)
            {
                Debug.LogError("Error: " + webRequest.error);
                // Handle error
            }
            else
            {
                ApiResponse apiData = JsonUtility.FromJson<ApiResponse>(webRequest.downloadHandler.text);
                DisplayCharacterInfo(apiData);
                Debug.Log(apiData.data);
            }
        }
    }

    void DisplayCharacterInfo(ApiResponse apiData)
    {
        if (apiData.data != null && apiData.data.Count > 0)
        {
            foreach (var character in apiData.data)
            {
                // Create a new cell prefab for each character
                GameObject cellObject = Instantiate(cellPrefab, content);
                CellController cellController = cellObject.GetComponent<CellController>();

                // Set data for the CellController
                cellController.SetData(character);
            }
        }
    }
}
아래는 Cell 프리팹에 들어가는 CellController 스크립트이다.
using System.Collections;
using System.Collections.Generic;
using UnityEngine;
using UnityEngine.UI;

public class CellController : MonoBehaviour
{
    [SerializeField] Text legacyname;
    [SerializeField] Text location;
    [SerializeField] Text locationDetailed;
    [SerializeField] Text type;
    [SerializeField] Text designatedDate;

    public void SetData(CharacterInfo character)
    {
        legacyname.text = character.명칭;
        location.text = character.소재지_구;
        locationDetailed.text = character.소재지_상세;
        type.text = character.종목;
        designatedDate.text = character.지정일;
    }
}

강사님의 답을 보자
일단 다시 Scroll View를 이용해서 새 Scene에서 UI를 다시 만든다. 프리팹용 Panel을 만드는 모습이다. 이전과 똑같이 UI를 만든다.

"data"는 [10]으로 배열인 것을 볼 수 있다. 총 개수는 45개이고 한 페이지마다 10개씩 표시되는 것을 볼 수 있다.

위의 7개 중 5개의 정보만 가져올 것이므로 해당 이름에 맞는 이름을 붙여준다.
셀의 피봇과 앵커를 수정하고 Padding 값도 조금 준다.

한글 폰트는 아래의 사이트에서도 찾아볼 수 있다.
눈누
상업용 무료한글폰트 사이트
noonnu.cc
폰트 적용 방법은 이전에도 설명했었는데, 폰트를 Project 폴더로 가져와서 [Create] - [TextMeshPro] - [Font Asset]으로 만들어서 적용한다.

[Window] - [TextMeshPro] - [Font Asset Creator]에서도 가능하다.


[Font Asset Creator]으로 할 경우, [Atlas Population Mode]를 [Dynamic]으로 설정해야한다.
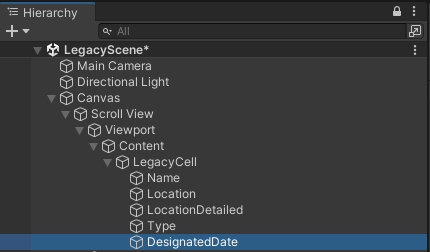
완성된 LegacyCell은 프리팹화.

Content도 다음과 같이 설정한다.
여러 개를 만들면 의도한 대로 잘 붙어서 나온다.

이제 LegacyCellController를 생성한다.
using System.Collections;
using System.Collections.Generic;
using TMPro;
using UnityEngine;

public class LegacyCellController : MonoBehaviour
{
    [SerializeField] TMP_Text legacyName;
    [SerializeField] TMP_Text location;
    [SerializeField] TMP_Text locationDetail;
    [SerializeField] TMP_Text type;
    [SerializeField] TMP_Text designatedDate;

    private void Awake()
    {
        legacyName.text = "";
        type.text = "";
        designatedDate.text = "";
    }

    public void SetData(string legacyName, string type, string designatedDate)
    {
        this.legacyName.text = legacyName;
        this.type.text = type;
        this.designatedDate.text = designatedDate;
    }
}
컴포넌트 드래그 앤 드랍으로 추가

빈 오브젝트 DataManager 만들기. 여기에 LegacyDataManager 스크립트 컴포넌트를 추가한다.

LegacyDataManager에 들어갈 API URL에 고정된 값을 넣기 위해서 Constants 스크립트를 생성한다.

using System.Collections;
using System.Collections.Generic;
using UnityEngine;

public class Constants
{
    public const string url = "https://api.odcloud.kr/api/3080236/v1/uddi:d012ac59-76cc-436c-bd53-94cd5d243cdb"; //물음표 앞 까지 URL의 일부 입력
    public const int perPage = 10;
}
위의 내용은 LegacyDataManager에서 불러서 쓸 예정.
LegacyDataManager는 아직 미완성이지만 일단 여기까지 쓴 후 Parsing만을 위한 Legacy 스크립트를 하나 생성한다.
using System.Collections;
using System.Collections.Generic;
using UnityEngine;
using UnityEngine.Networking;

public class LegacyDataManager : MonoBehaviour
{
    [SerializeField] private string serviceKey; //서비스 키는 유출되지 않게 하기 위해서 Scene에서 관리할 예정이다.
    [SerializeField] private LegacyCellController legacyCellPrefab;
    [SerializeField] private Transform content;

    private void Start()
    {
        StartCoroutine(LoadData(0));
    }
    IEnumerator LoadData(int page) //몇 번째 page를 로드할 것인지
    {
        //서버 URL 설정
        string url = string.Format("{0}?page={1}&perPage={2}&serviceKey={3}", Constants.url, page, Constants.perPage, serviceKey);//여러 개의 문자열을 조합할 수 있다.

        UnityWebRequest request = new UnityWebRequest();
        using (request = UnityWebRequest.Get(url))
        {
            yield return request.SendWebRequest();

            if(request.result != UnityWebRequest.Result.Success)
            {
                Debug.Log(request.error);
            }
            else
            {
                string result = request.downloadHandler.text; //텍스트 형식으로 받아오기. 많이 불러왔었던 빼곡한 글들로 불러온다.

            }
        }
    }
}
파싱을 위한 Legacy 스크립트
using System;
using System.Collections;
using System.Collections.Generic;
using UnityEngine;

[Serializable]
public class Legacy //배열의 이름과 맞춘다. Legacy[] data
{
    public string 기준일;
    public string 명칭;
    //public string 소재지(구); //괄호가 있으면 불러와지지 않는다.
    //public string 소재지(상세); //괄호가 있으면 불러와지지 않는다.
    public int 연번;
    public string 종목;
    public string 지정일;
}

public class LegacyData //JSON 전체의 큰 틀을 가지는 형식.
{
    public int currentCount;
    public Legacy[] data; //배열이다
    public int matchCount;
    public int page;
    public int perPage;
    public int totalCount;
}
완성된 LegacyDataManager 스크립트
using System.Collections;
using System.Collections.Generic;
using UnityEngine;
using UnityEngine.Networking;

public class LegacyDataManager : MonoBehaviour
{
    [SerializeField] private string serviceKey; //서비스 키는 유출되지 않게 하기 위해서 Scene에서 관리할 예정이다.
    [SerializeField] private LegacyCellController legacyCellPrefab;
    [SerializeField] private Transform content;

    private void Start()
    {
        StartCoroutine(LoadData(0));
    }
    IEnumerator LoadData(int page) //몇 번째 page를 로드할 것인지
    {
        //서버 URL 설정
        string url = string.Format("{0}?page={1}&perPage={2}&serviceKey={3}", Constants.url, page, Constants.perPage, serviceKey);//여러 개의 문자열을 조합할 수 있다.

        UnityWebRequest request = new UnityWebRequest();
        using (request = UnityWebRequest.Get(url))
        {
            yield return request.SendWebRequest();

            if(request.result != UnityWebRequest.Result.Success)
            {
                Debug.Log(request.error);
            }
            else
            {
                string result = request.downloadHandler.text; //텍스트 형식으로 받아오기. 많이 불러왔었던 빼곡한 글들로 불러온다.

                LegacyData legacyData = JsonUtility.FromJson<LegacyData>(result); //파싱에서 가져온 이름 LegacyData
                Legacy[] legacyArray = legacyData.data;

                for(int i = 0; i < legacyArray.Length; i++)
                {
                    LegacyCellController legacyCellController = Instantiate(legacyCellPrefab, content);
                    legacyCellController.SetData(legacyArray[i].명칭, legacyArray[i].종목, legacyArray[i].지정일);
                }
            }
        }
    }
}
DataManager 빈 오브젝트에 LegacyDataManager 스크립트 넣고 빈 곳을 채운다. [ServiceKey]는 내 서비스 키를 입력하고, [LegacyCellPrefab]은 프리팹을 끌어다 넣고, [Content]는 Canvas의 Content를 끌어다 놓는다.

성공했다! API에 대한 이해도가 상승했다!


